
CHAPTERTWELVE
12.9
One of the nice things about Photoshop is that you are not limited by reality.
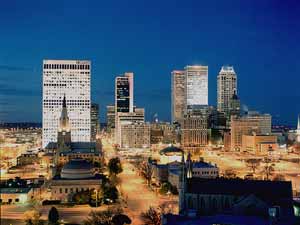
Here is a case in point; Tulsa has a nice downtown skyline, and downtown is by the Arkansas River. But there is no really great, drop-dead angle where you can get the skyline perfectly reflected in the river.
In Photoshop, don't think of reality as a limitation, but a starting point.
To create this image start with a new 800x600 72 ppi, RGB, white contents image. Then also open the actual photo of the Tulsa skyline from the CD, labeled skyline1.bmp.
As always, think in terms of layers. Can you see this image as layers?
The background is a black star-filled night.
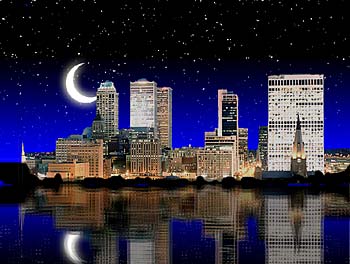
The blue gradient is next, then the moon. In the middle of the layer stack is the buildings of the skyline. Another layer is the reflection; simply the top two-thirds of the image copied, pasted and vertically flipped. Filters make the lower third look like shimmering water. The water's edge is drawn with black brush, copied and flipped to make it's reflection.
What's so hard about this? You can do it. No sweat.
To make the starry night
Create a new layer. Fill it with black then create a starfield like you
did before in Photoshop Now, Cheap Trick # 4, on page 34.
To make the twilight horizon
Create a new layer. Drag a rectangular selection that covers the top two thirds
of the image. Set the foreground color to a dark, saturated blue. Select the
gradient tool. Choose foreground to transparent, which is the second option
in the gradient palette. Choose Linear, the first of the five gradient types
available in the options bar. Drag a blue-to-transparent gradient from the
lower edge of the rectangular selection, to the top of the image to make the
blue twilight color blend from the horizon into the night sky.
To make the moon
Create a new layer. Select
the elliptical marquee, So it will make a circle instead of an ellipse, set
it to a constrained aspect ratio of 1 to 1. Drag a circle. Set the overlap
function (four button group in the Options bar) to subtract. Then drag a second
circle in such a way that only where the two circles overlap will be left
and it will be in the shape of a crescent moon. (If you are real lazy you
could just make it a full moon.) Fill the moon with white by making white
the foreground color, then hitting Alt + the backspace key. Make the moon
glow by adding a layer style of
you guessed it! Outer Glow to the moon. Because
the moon is on it's own layer you can reposition it in the sky or transform
it's angle or size later. Don't
worry about it right now.
To insert the skyline
Open the skyline.jpg Select
the entire image, copy it, then paste it into the new fantasy image. Erase
everything on the layer but the buildings.
The Reflection
Now that we have the top two thirds of the image like we want it, we need
to copy and flip it to make up the reflected image.
But ...we have all these separate components on separate layers do we have to copy all of them separately?
If we merge the layers we will loose the ability to edit the layers, so we don't want to do that How can you copy objects on multiple layers?
A Trick
Try this. Use the rectangular
marquee to select everything from the horizon to the top of the image. Click
on Layers>flatten image (don't panic, it's okay). Click on Edit>copy(your
selection is now on the clipboard). Click on Edit> undo copy (don't panic,
it's still okay). Then click on Edit>step backward to undo the flattening
of the layers. Interestingly enough, your flattened, copied selection is still
on the clipboard. Click on Edit>paste and you will see your flattened, copied
selection pasted on a new layer. You now have all items copied and pasted,
yet still have your layers.
Flip the copied selection vertically by clicking on Edit>Transform>flip vertically. Use the move tool to move it down until the "horizon" lines no longer overlap.
Creating the shoreline
Logically the skyscrapers don't begin in the water, so the image will look
more realistic if we create some shoreline. Create a new layer and with a
small paintbrush paint in a shoreline in black. Copy and vertically flip that
layer also so it will also mirror in the water.
Making a water reflection
To "ripple" the water reflection; Select the upside down, skyline layer. There
are several things under the Filters>Distort>
. that produce a reflected water
effect.
Try;
- Glass; Distortion 1, Smoothness 3, Frosted, Scaling 183%.
- Ocean Ripple, your choice.
- Ripple; 100% medium or large.
Lake or River?
If the water is moving(a
river) the reflected image will streak. Reproduce this effect with a motion
blur. Filter>Blur>Motion Blur. You don't want to blur so much the buildings
become unrecognizable, maybe about 24 pixels. Try
it at 0 degrees and at 90 degrees.
Night Reflections
Because a nighttime water reflection absorbs some of the light, it is not
as bright at the original, therefore adjust this layer so it is not as bright
or as contrasty. Click on Image>Adjust>brightness/contrast and darken it to
taste. If you really dig the reflected water stuff, Flaming Pear makes a $20
plug-in called "flood" that does incredibly realistic water reflections. Available
from their website: www.flamingpear.com